Multi-factor authentication is no longer optional on Microsoft 365. Microsoft now requires it, so if you have not set it up yet you will be prompted the next time you sign in.
It is worth doing gladly rather than grudgingly. A password on its own is a single thing standing between a stranger and your email, and passwords leak constantly through breaches on other websites. Multi-factor authentication adds a second step that somebody on the other side of the world cannot get past, because it needs the phone in your pocket.
It also asks far less of you than most people expect. Once it is set up you are not approving sign-ins all day. Outlook and your devices stay signed in as normal, and you are only asked when you enter your password somewhere new: a new device, a new app, or signing in through a web browser.
Every screen is pictured below, so you can check that what you are seeing matches what you should be seeing. It takes about five minutes.
Do this on a computer with your phone next to you. The setup moves between the two, and it is much easier with both in front of you. And do read each screen as you go: most of the trouble people hit comes from tapping past a screen that was asking for something slightly different.
Before you begin
Download the Microsoft Authenticator app to your phone from the App Store or Google Play (opens in a new tab). It is free.
You can use another authenticator app such as Google Authenticator if your team already relies on one, though the screens below show Microsoft Authenticator.
If you are not prompted to set up multi-factor authentication when you sign in, it is usually already enabled on your account, in which case skip ahead to adding another device.
Setting up your first device
Step 1
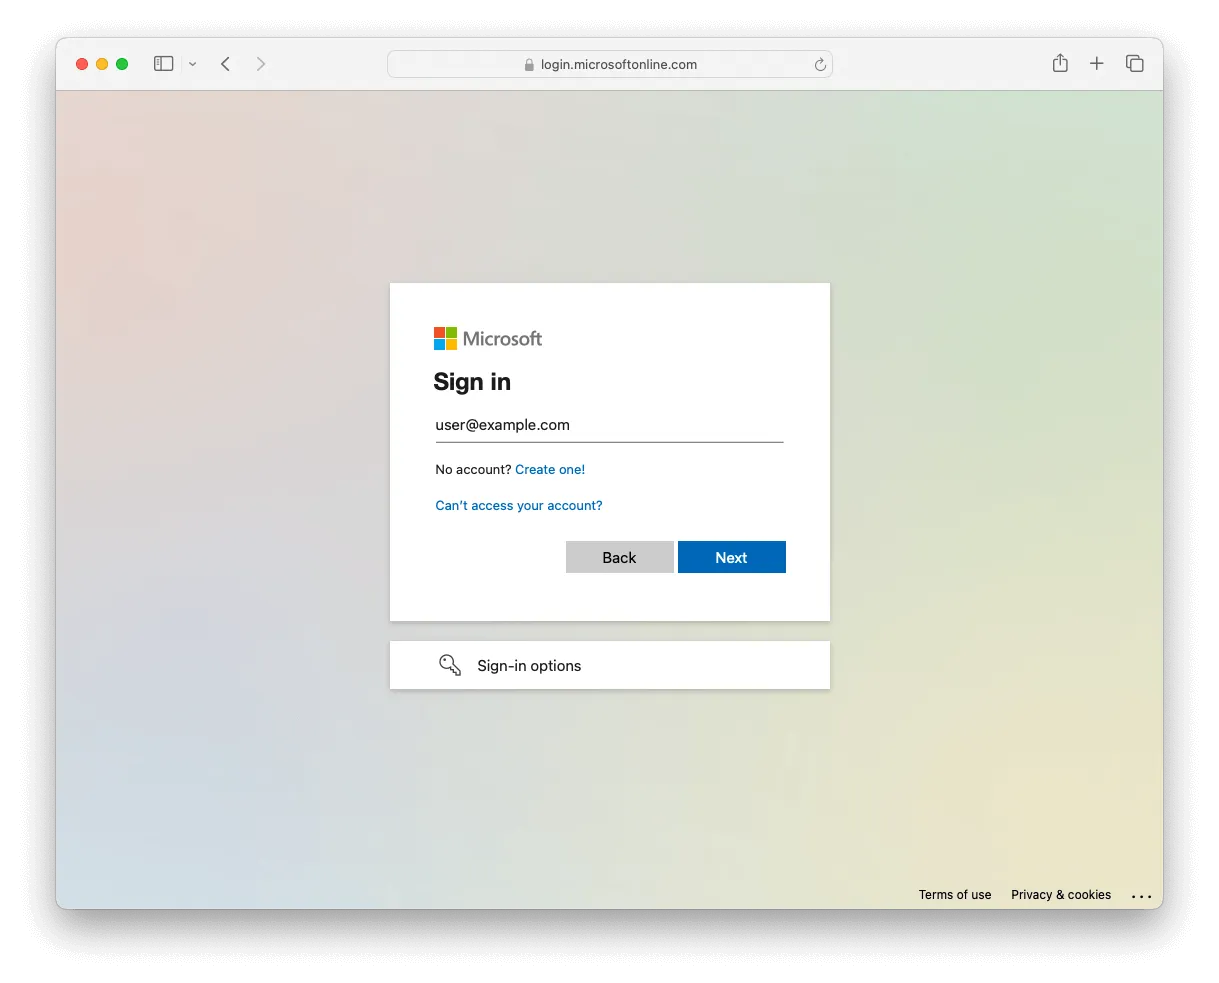
Visit login.microsoftonline.com (opens in a new tab) in a web browser and enter the email address of the account you are setting up.
Step 2
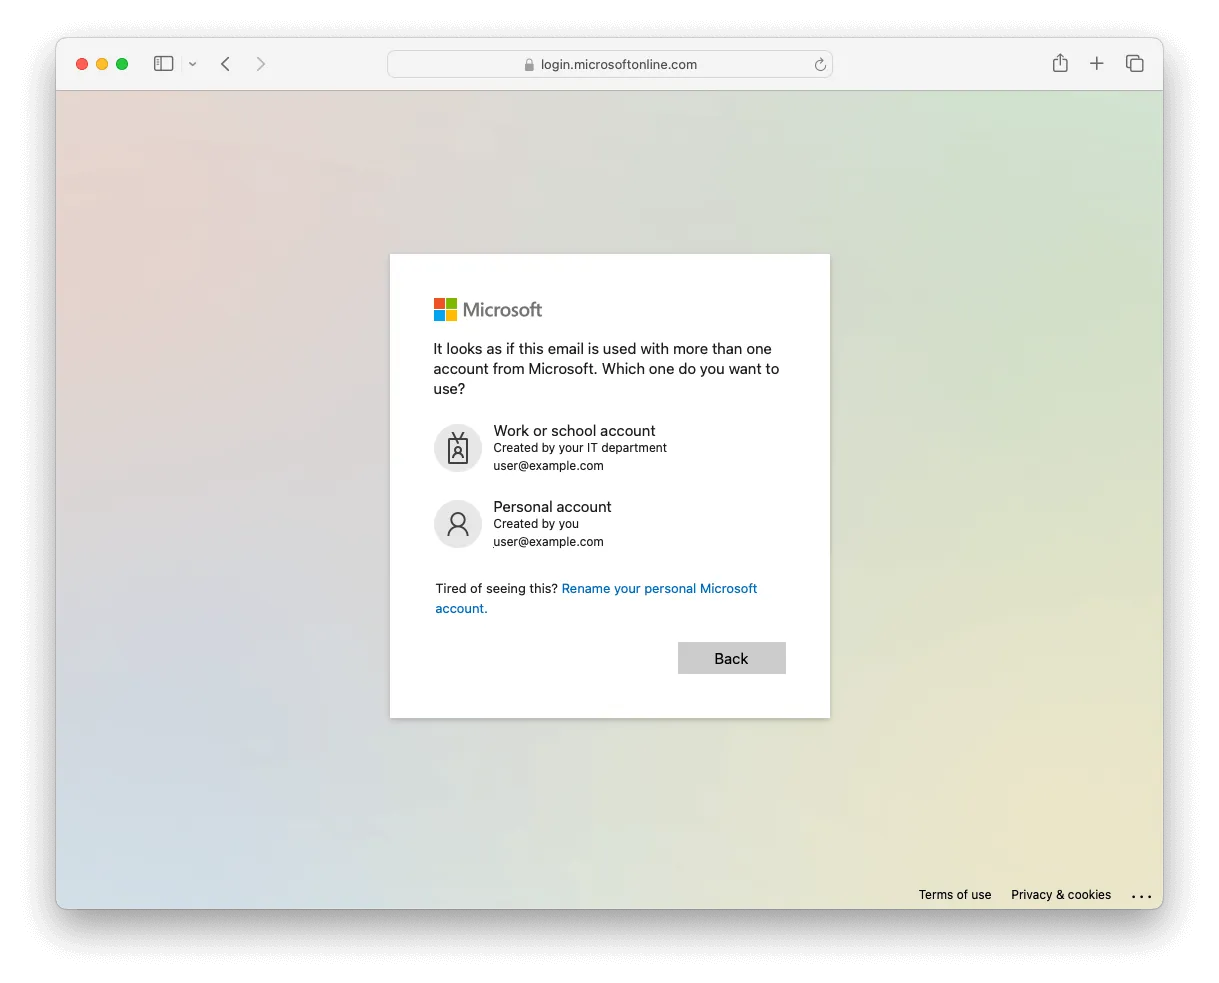
You may be asked to choose an account type. If you are, select Work or school account.
Step 3
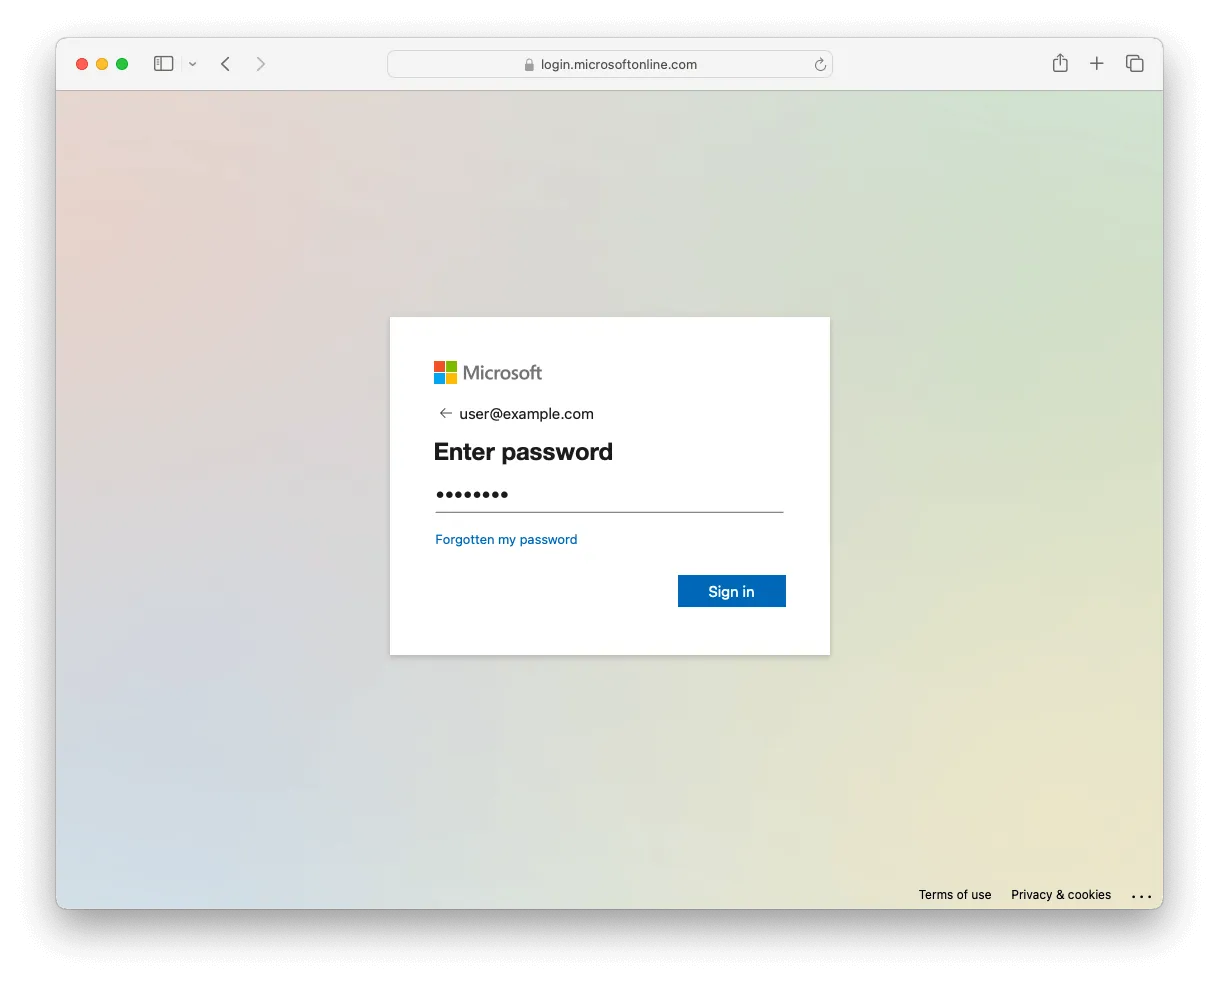
Enter your account password.
Step 4
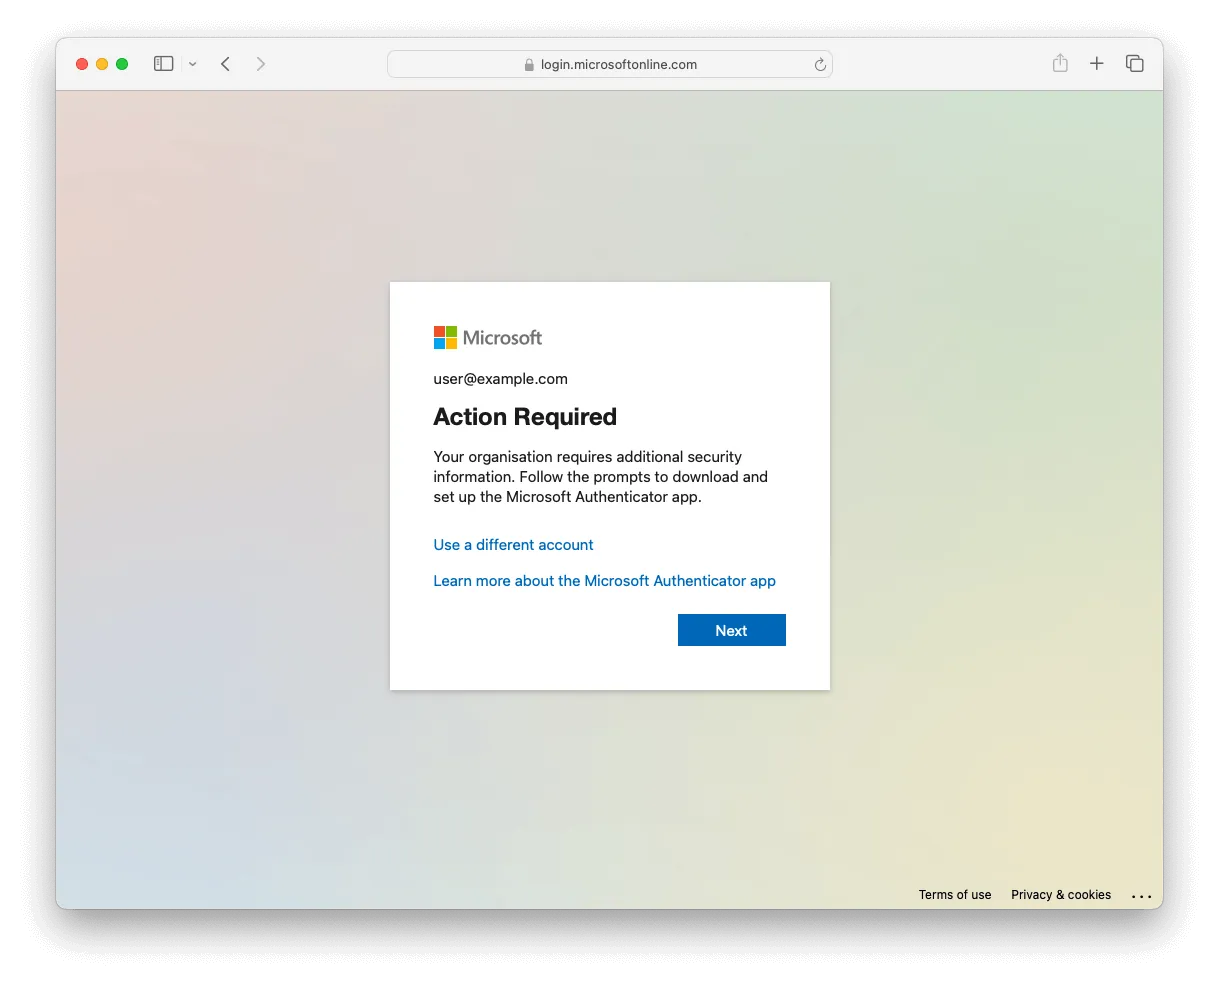
You will be prompted to set up multi-factor authentication. Select Next to begin.
Step 5
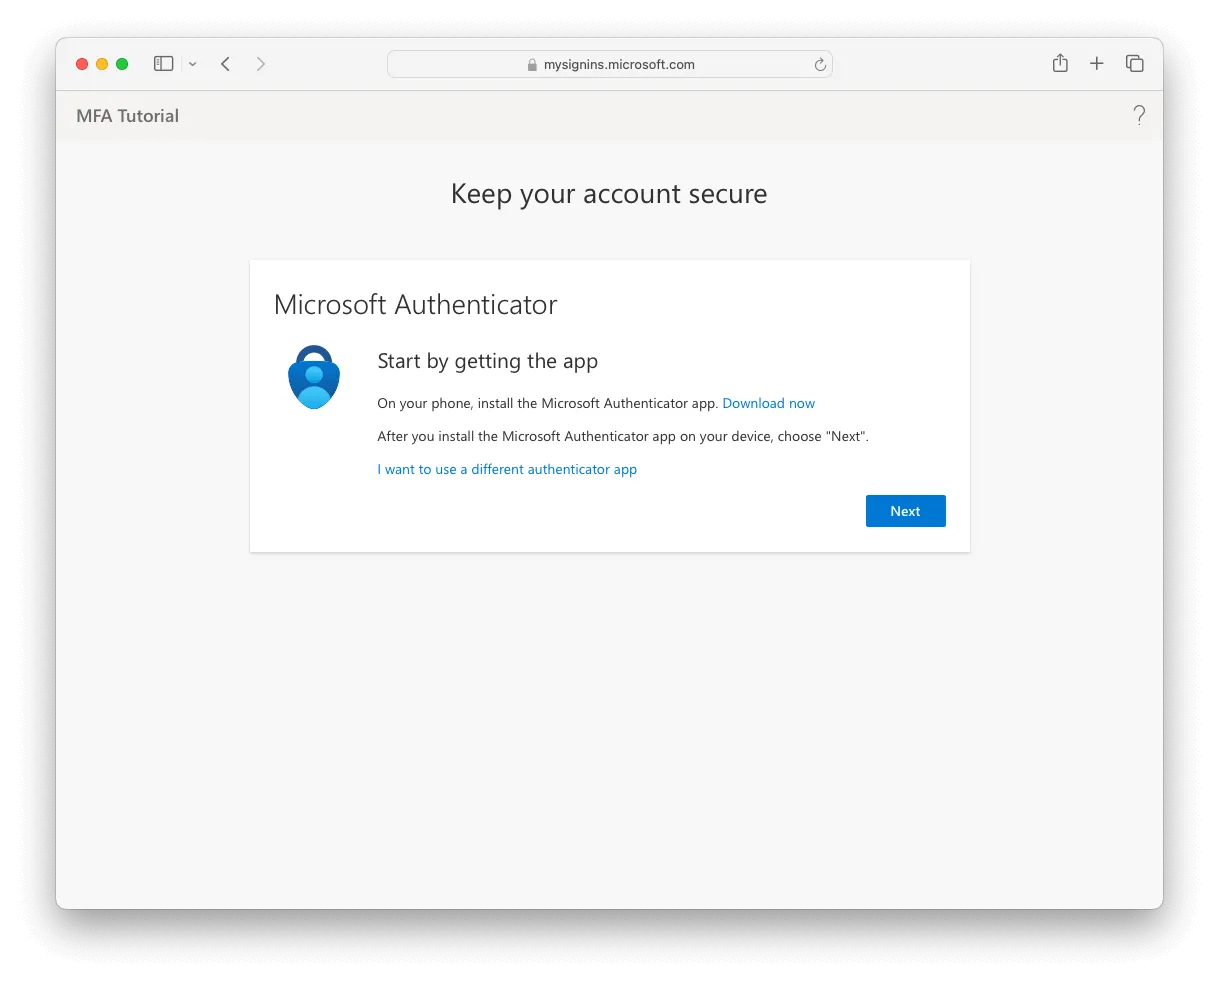
You will see a page like the one below. If you have not installed Microsoft Authenticator on your phone yet, do that now before carrying on. Once it is installed, select Next.
Step 6
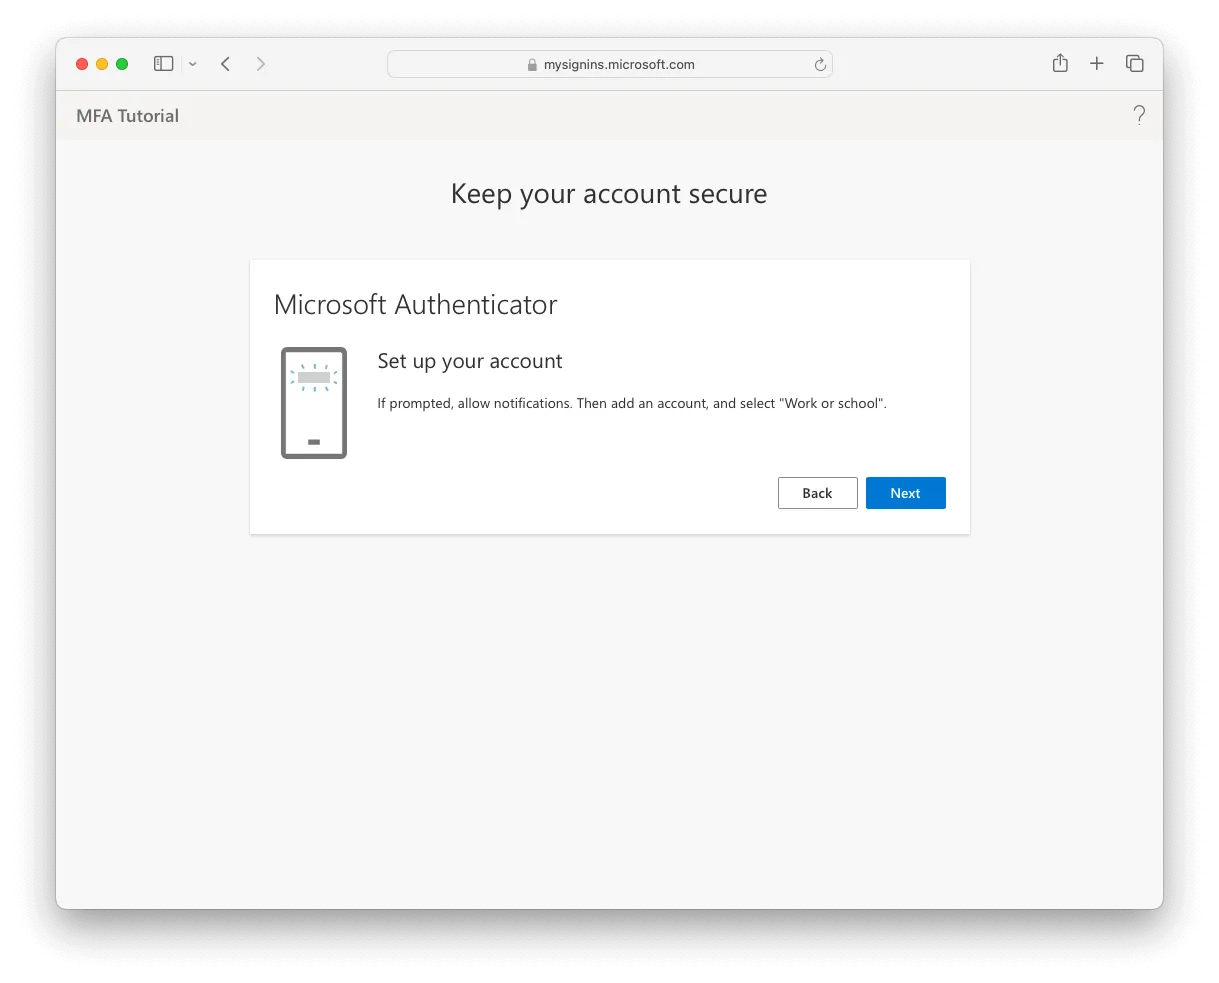
The page confirms you will be setting up a work or school account. Select Next.
Step 7
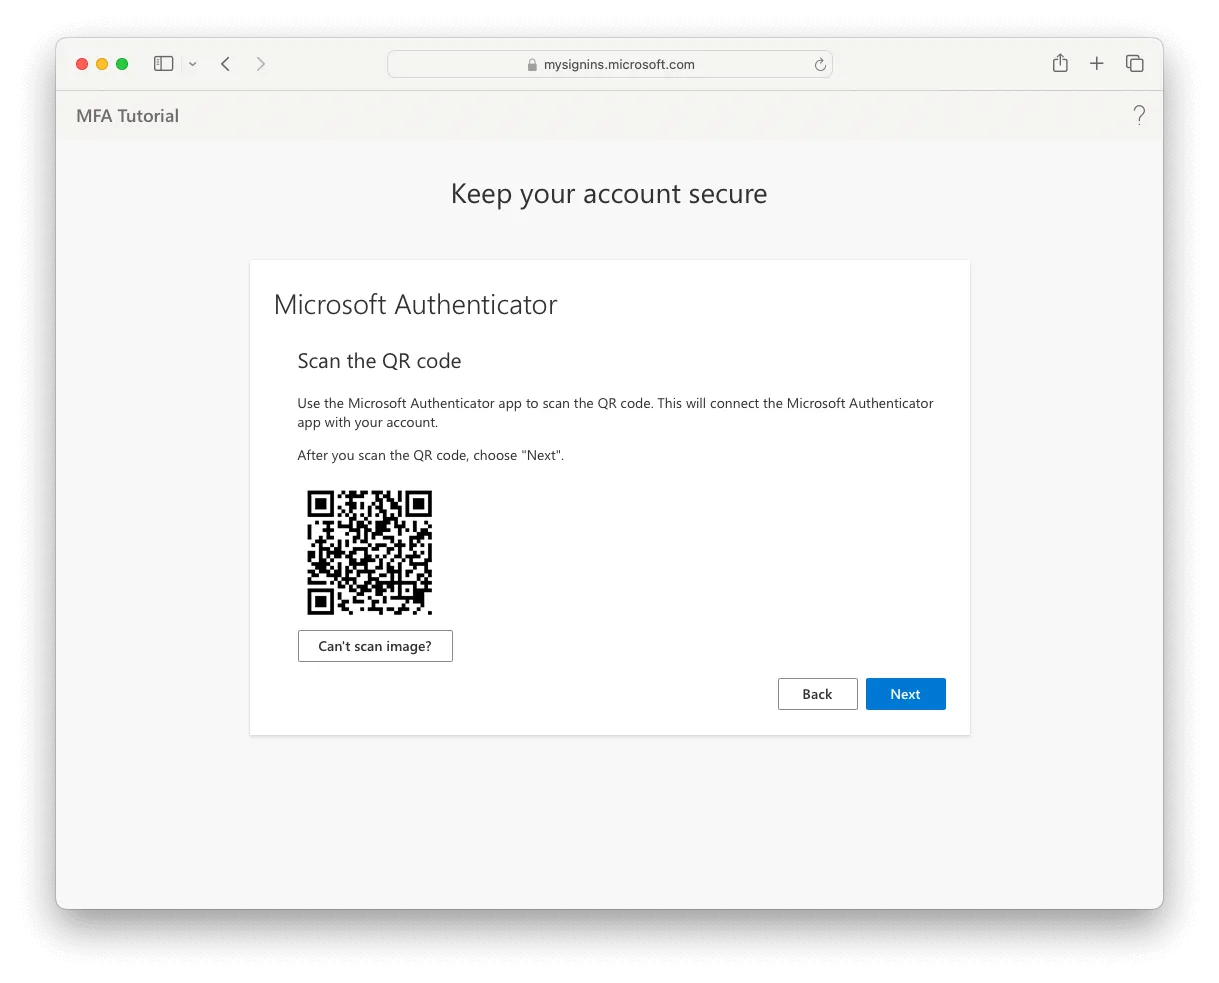
The page now shows a QR code. Leave this on screen, because you need it on your phone in a moment.
Step 8
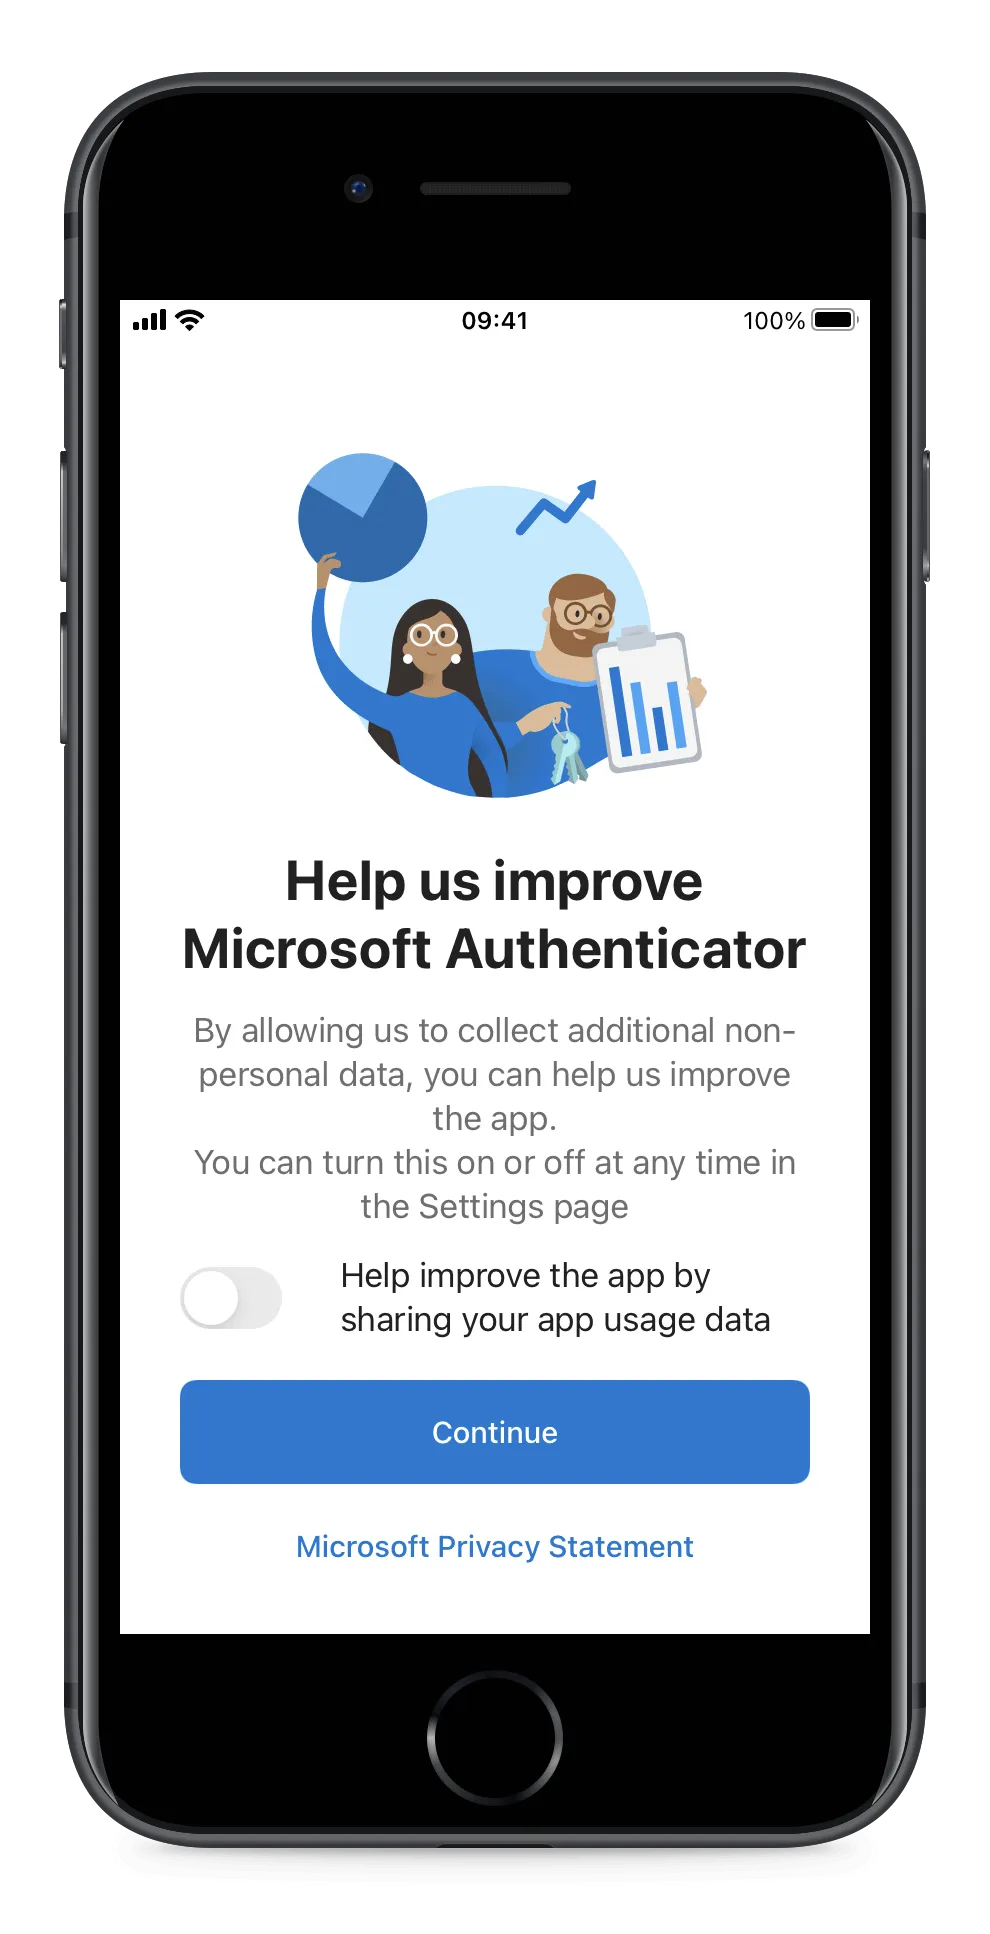
Now pick up your phone and open Microsoft Authenticator. Tap Continue.
If you have opened the app before you may not see this screen, in which case skip this step.
Step 9
Tap Skip. You are not signing in to an account on this screen.
Again, if you have used the app before you may not see this, so skip the step.
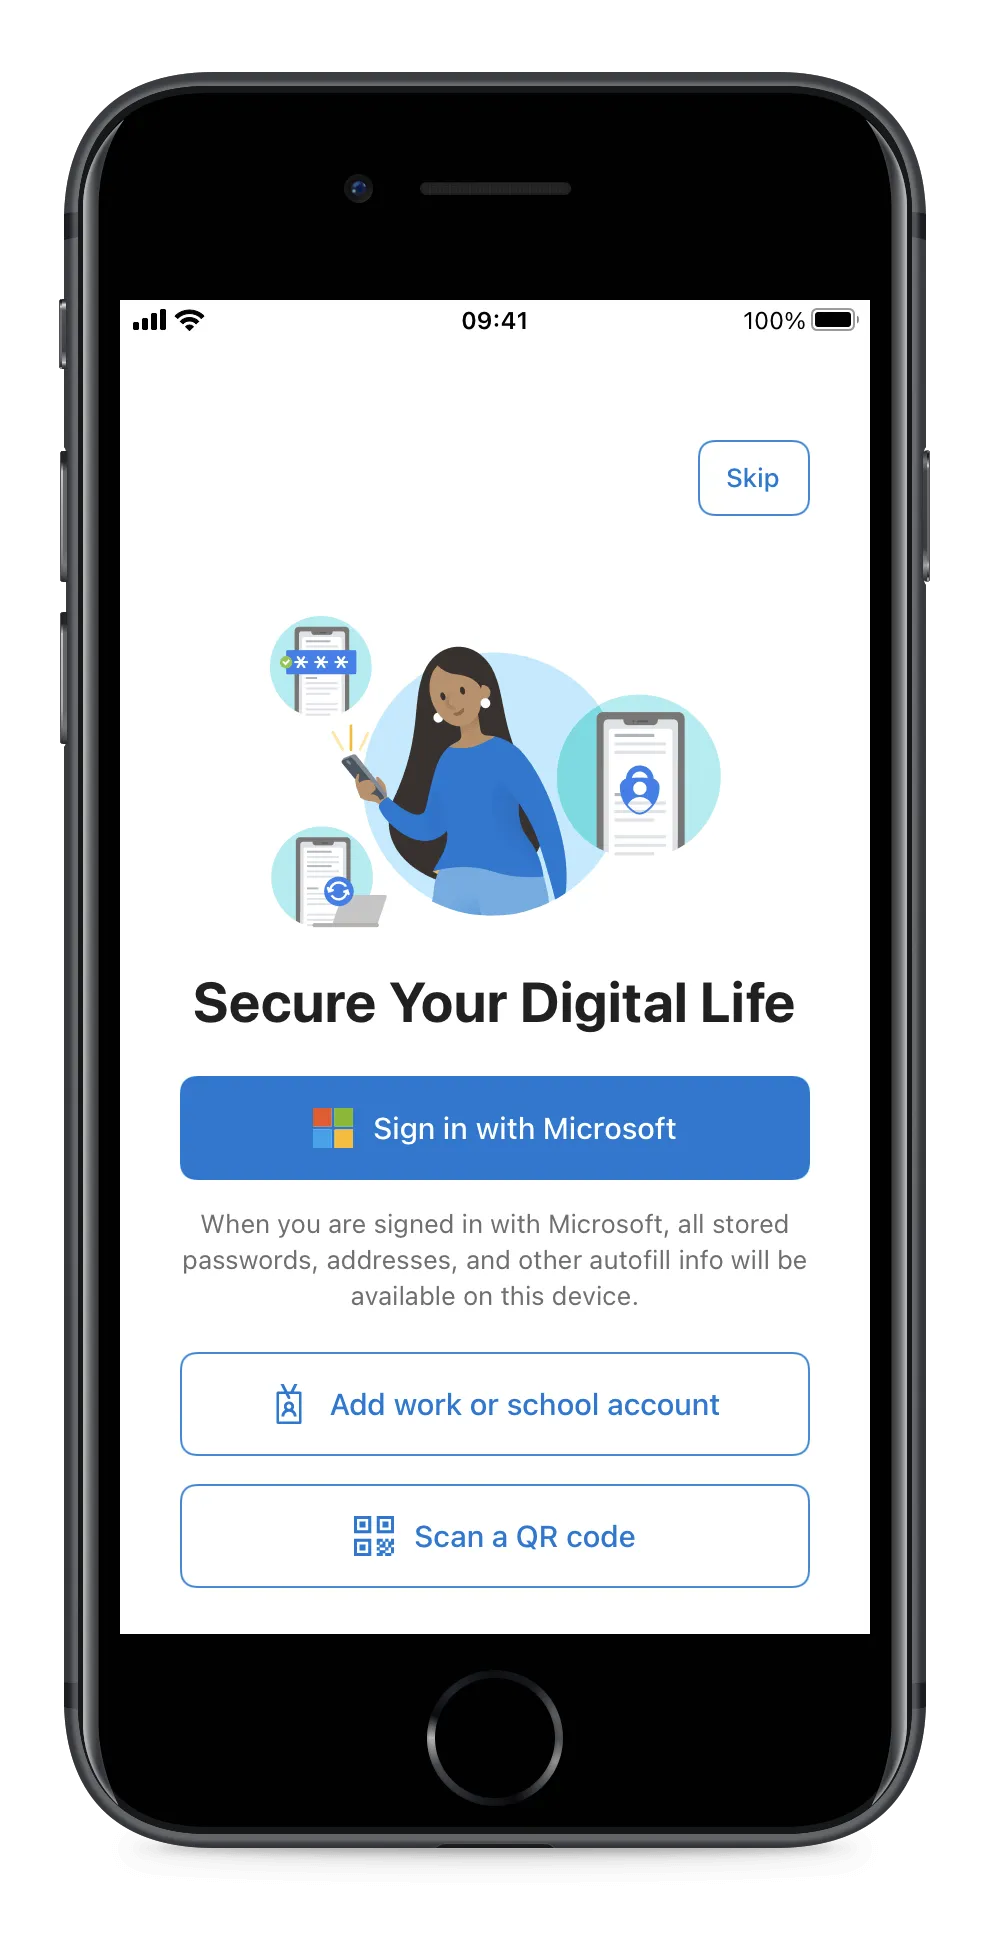
Step 10
If this is your first time in the app you will see a prompt to add an account. If you have used it before you will see the accounts already set up. Either way, tap the plus icon in the top right-hand corner.
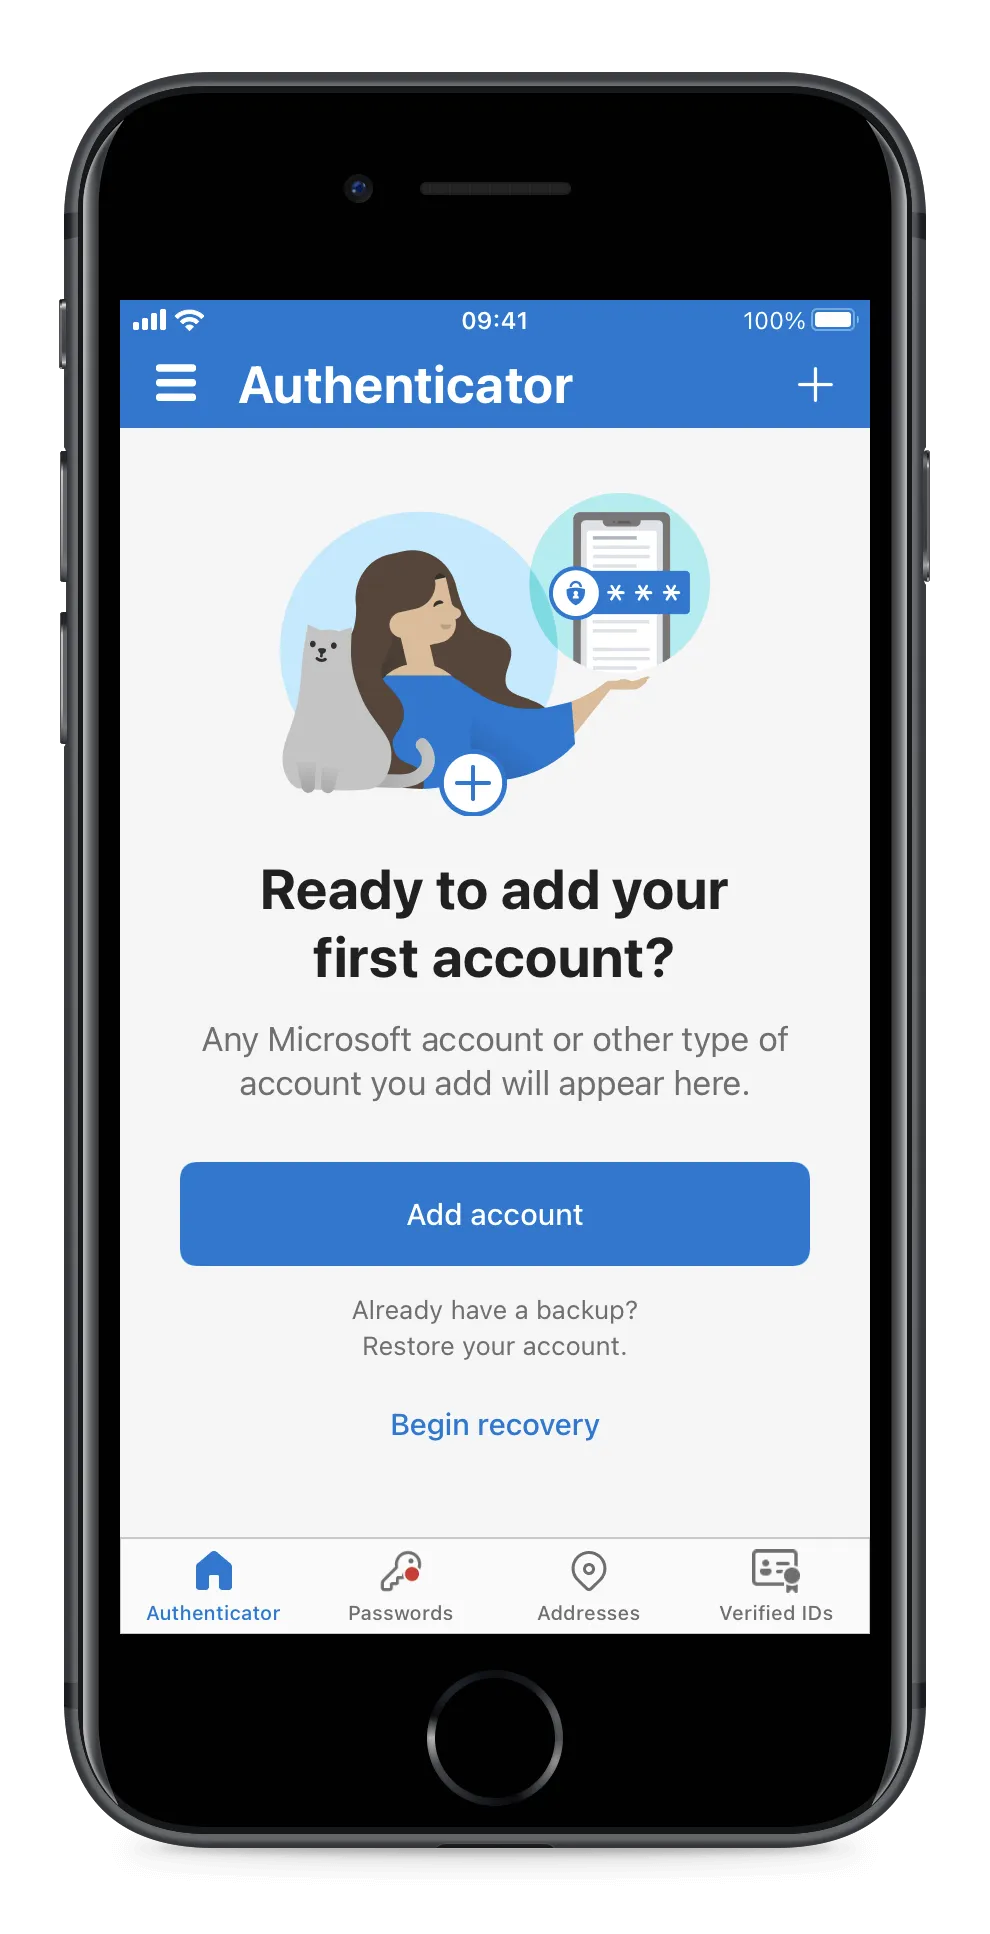
Step 11
Choose the kind of account you are adding. Select Work or school account.
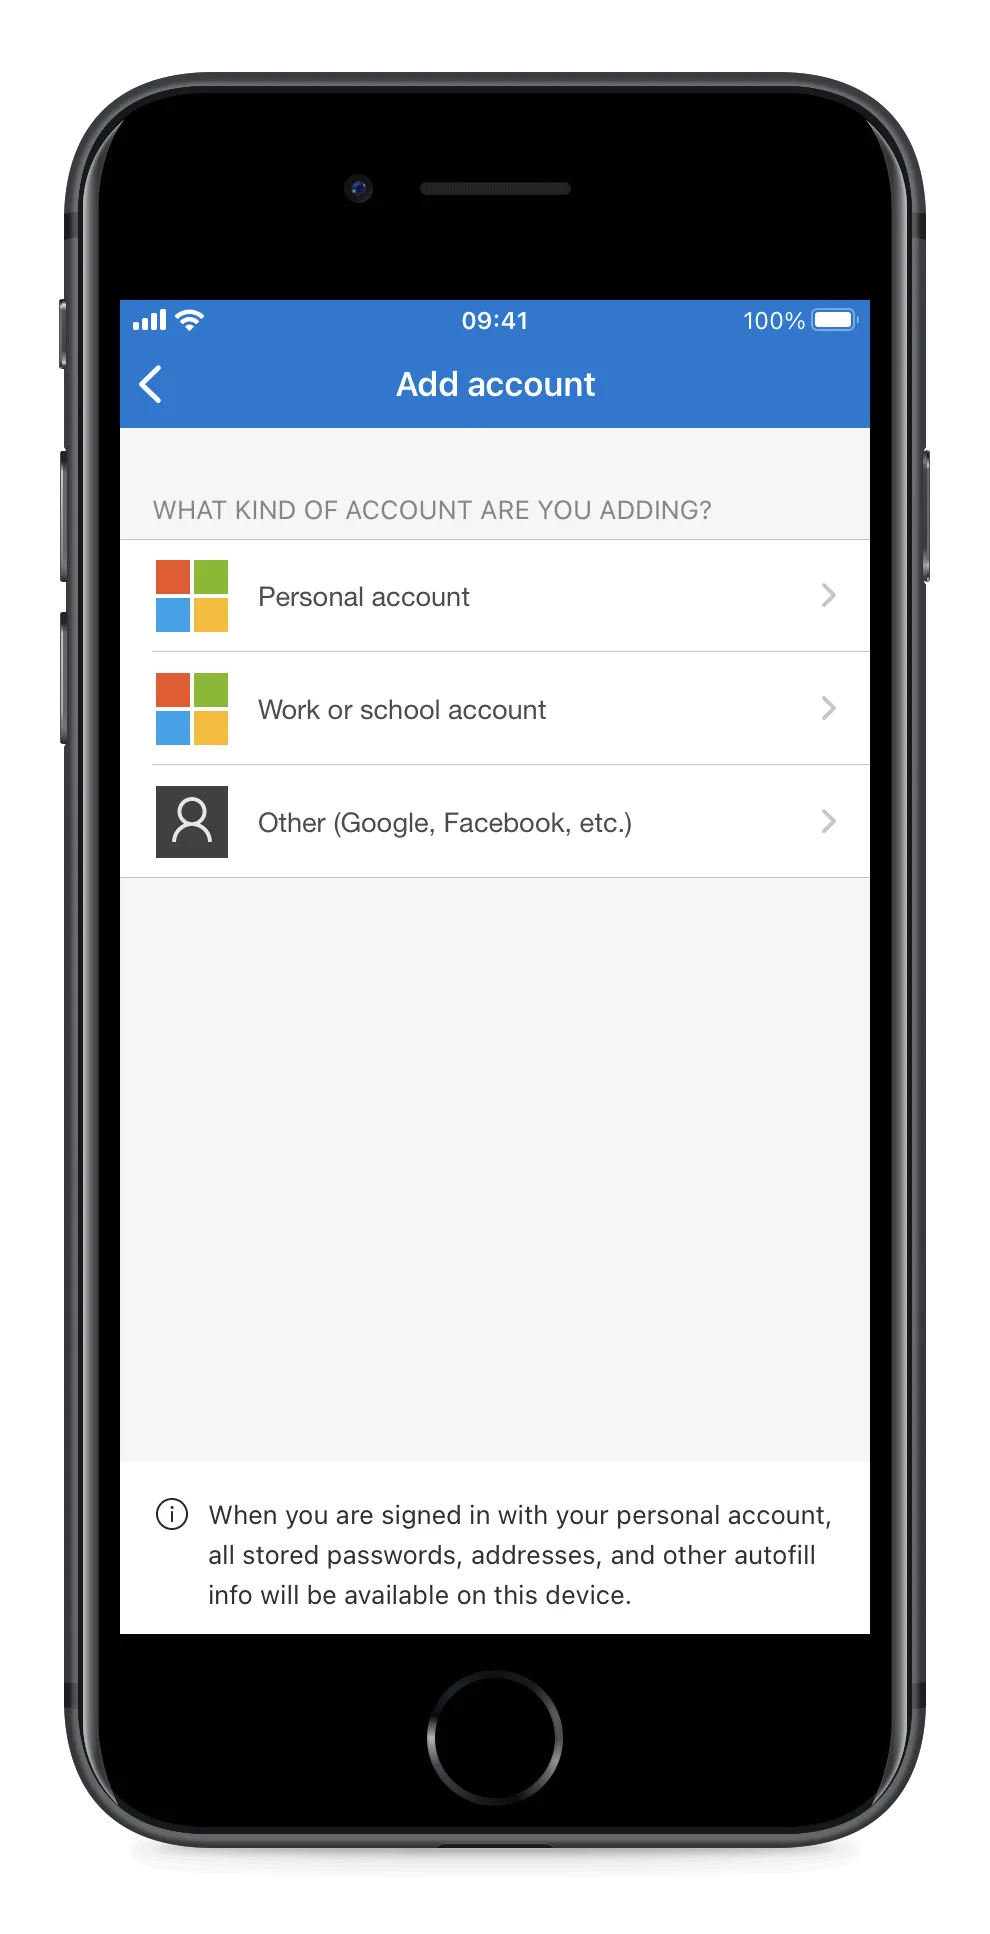
Step 12
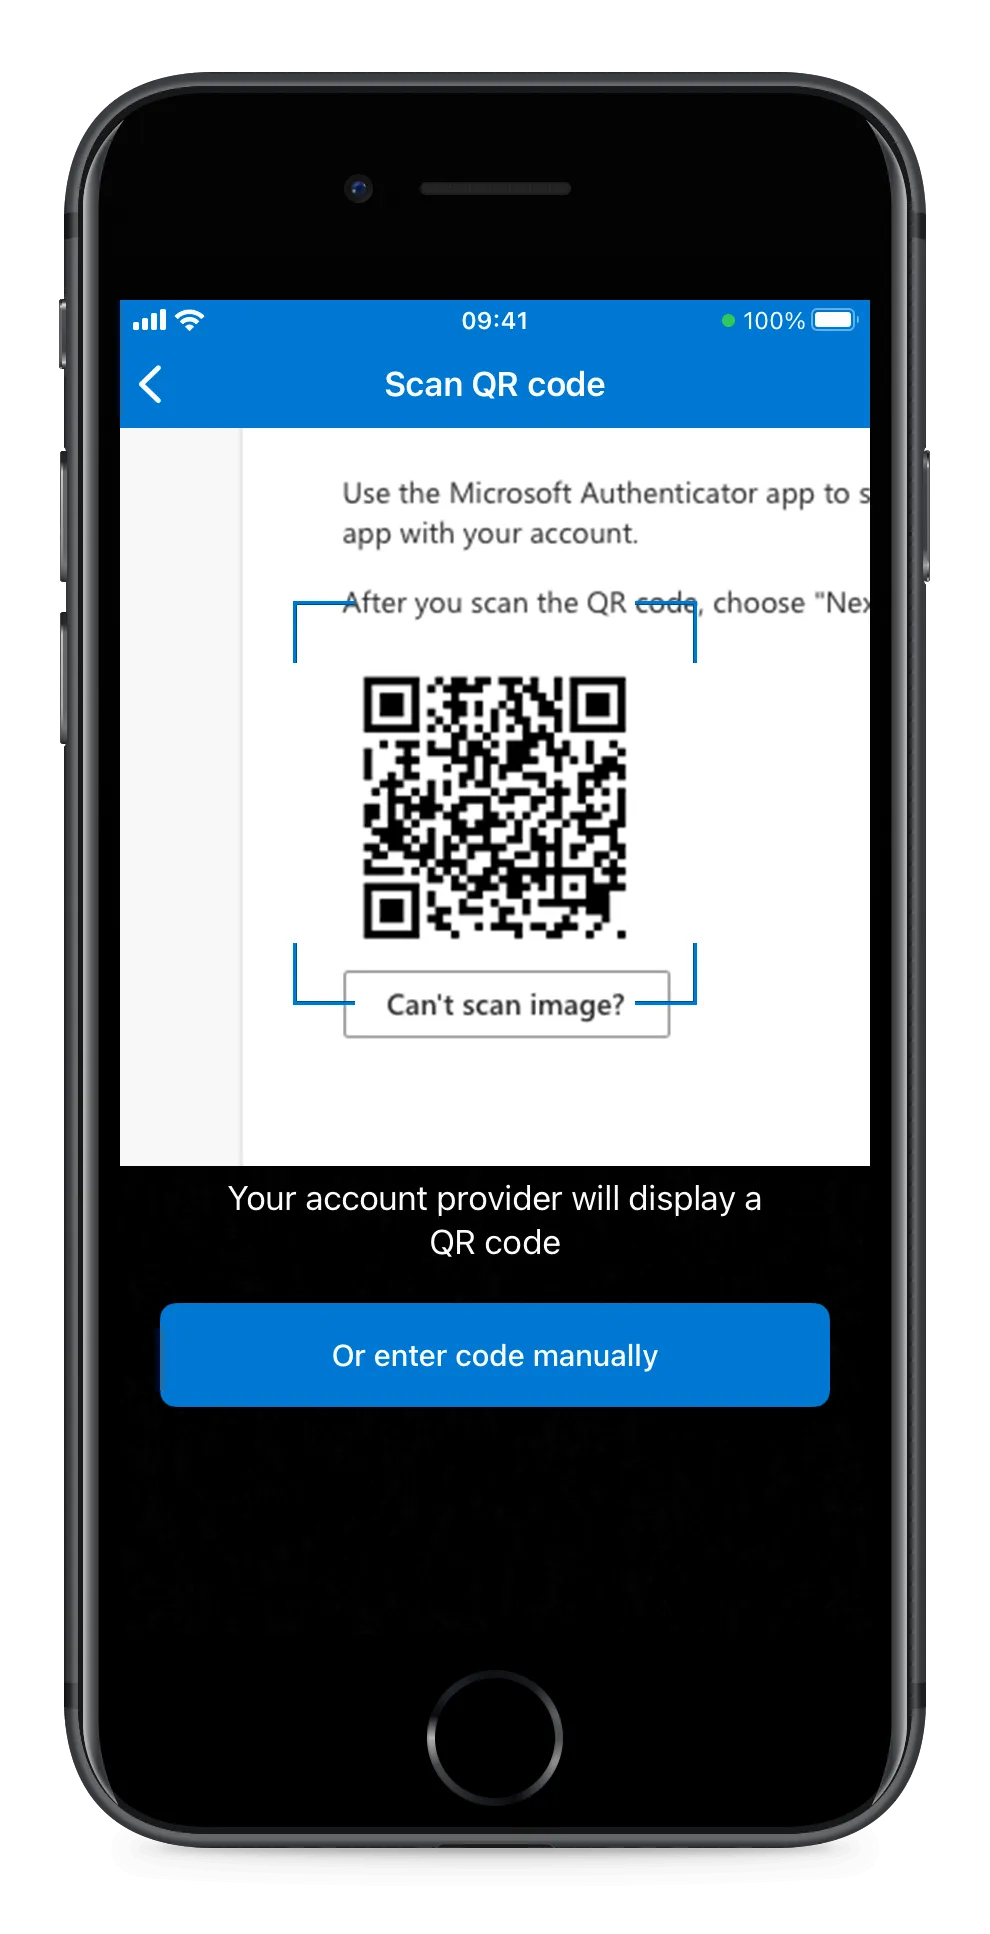
Tap Scan QR code in the options that appear.
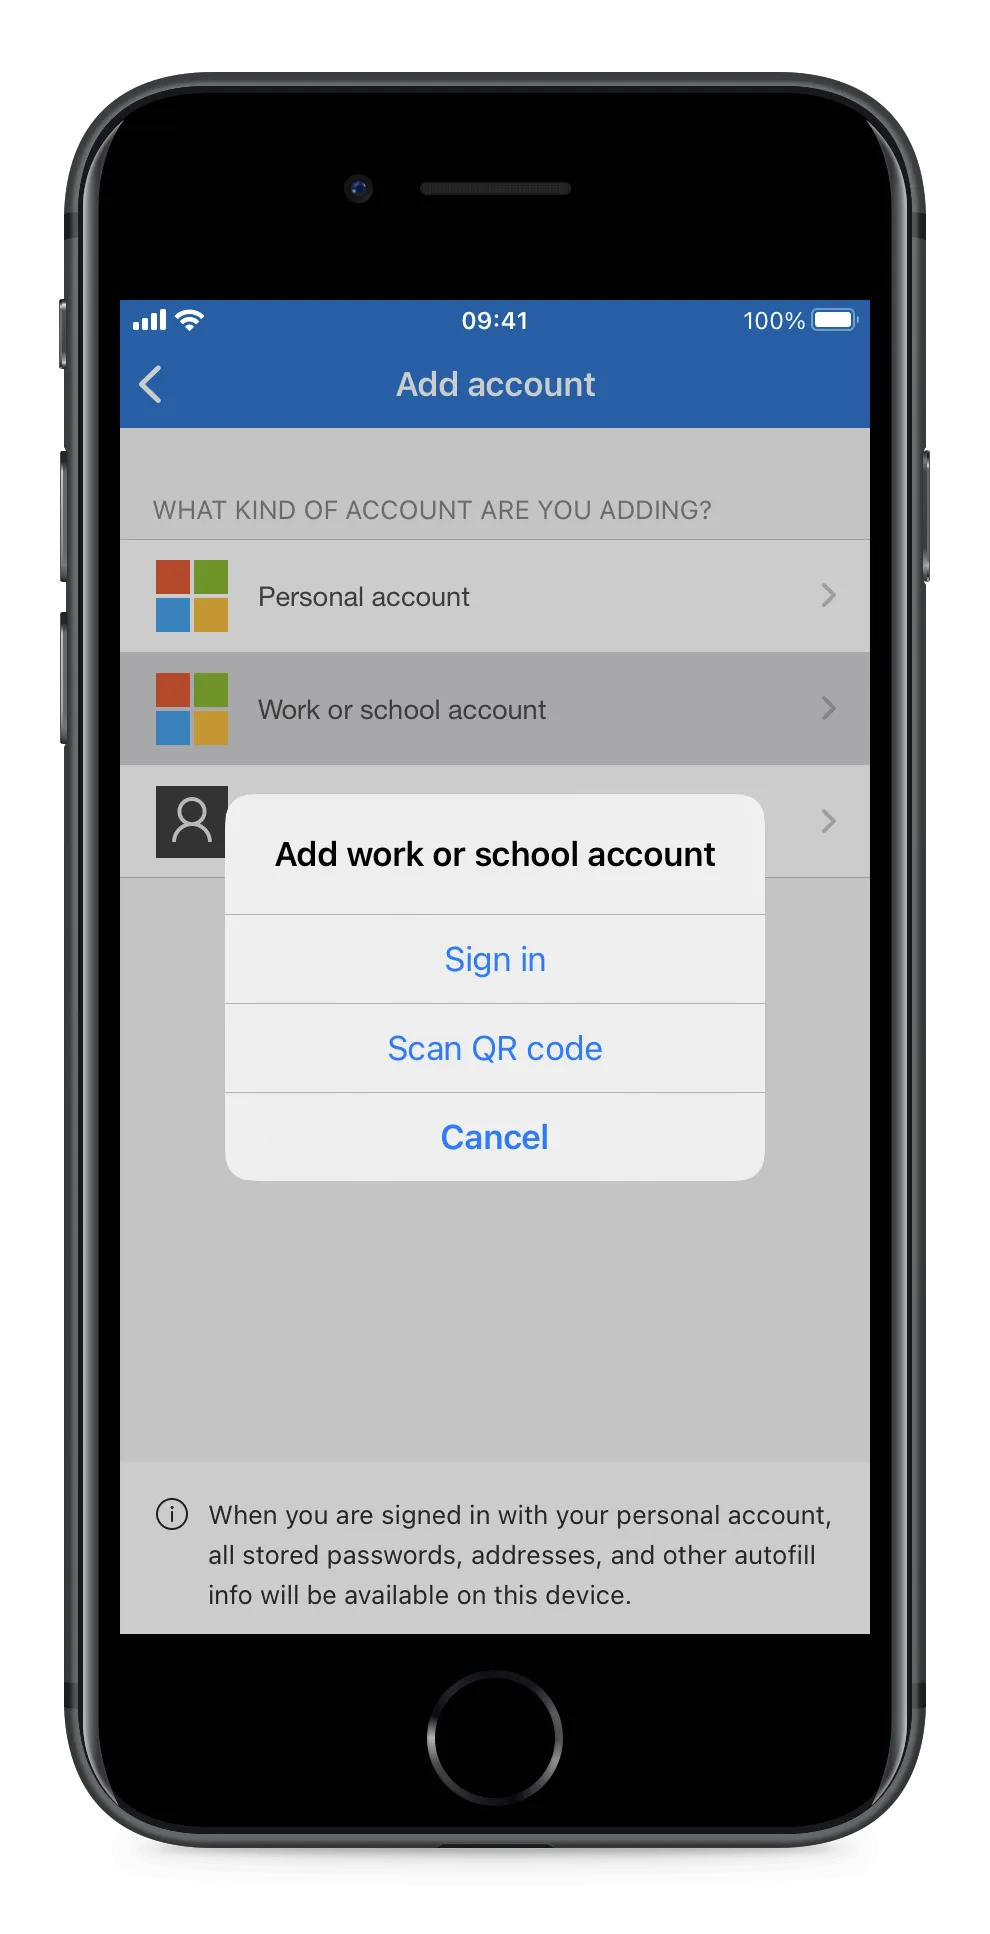
Step 13
You may be asked for permission to use the camera. Allow it.
Once the camera is running, point your phone at your computer screen to scan the QR code you left showing at Step 7.
Step 14
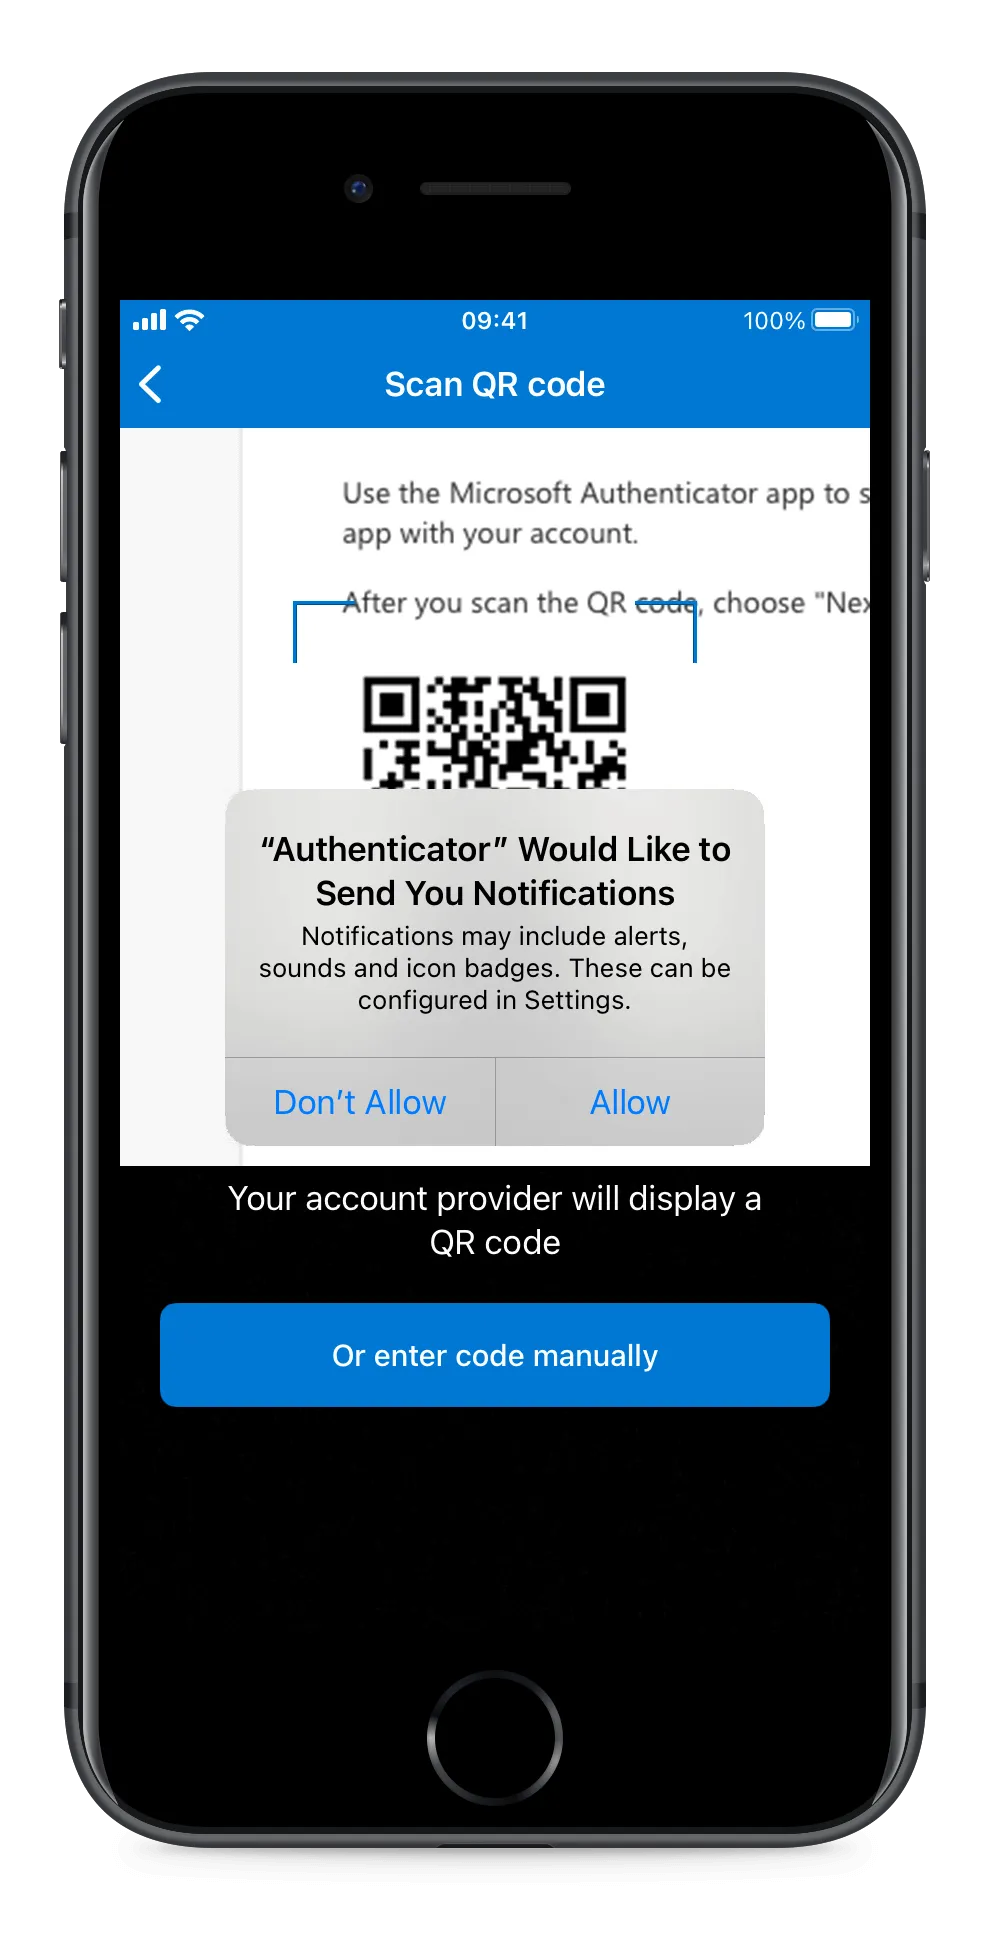
If this is your first time using the app you will be asked to allow notifications. Allow them. This is how the app tells you when somebody is trying to sign in to your account, so it matters.
Step 15
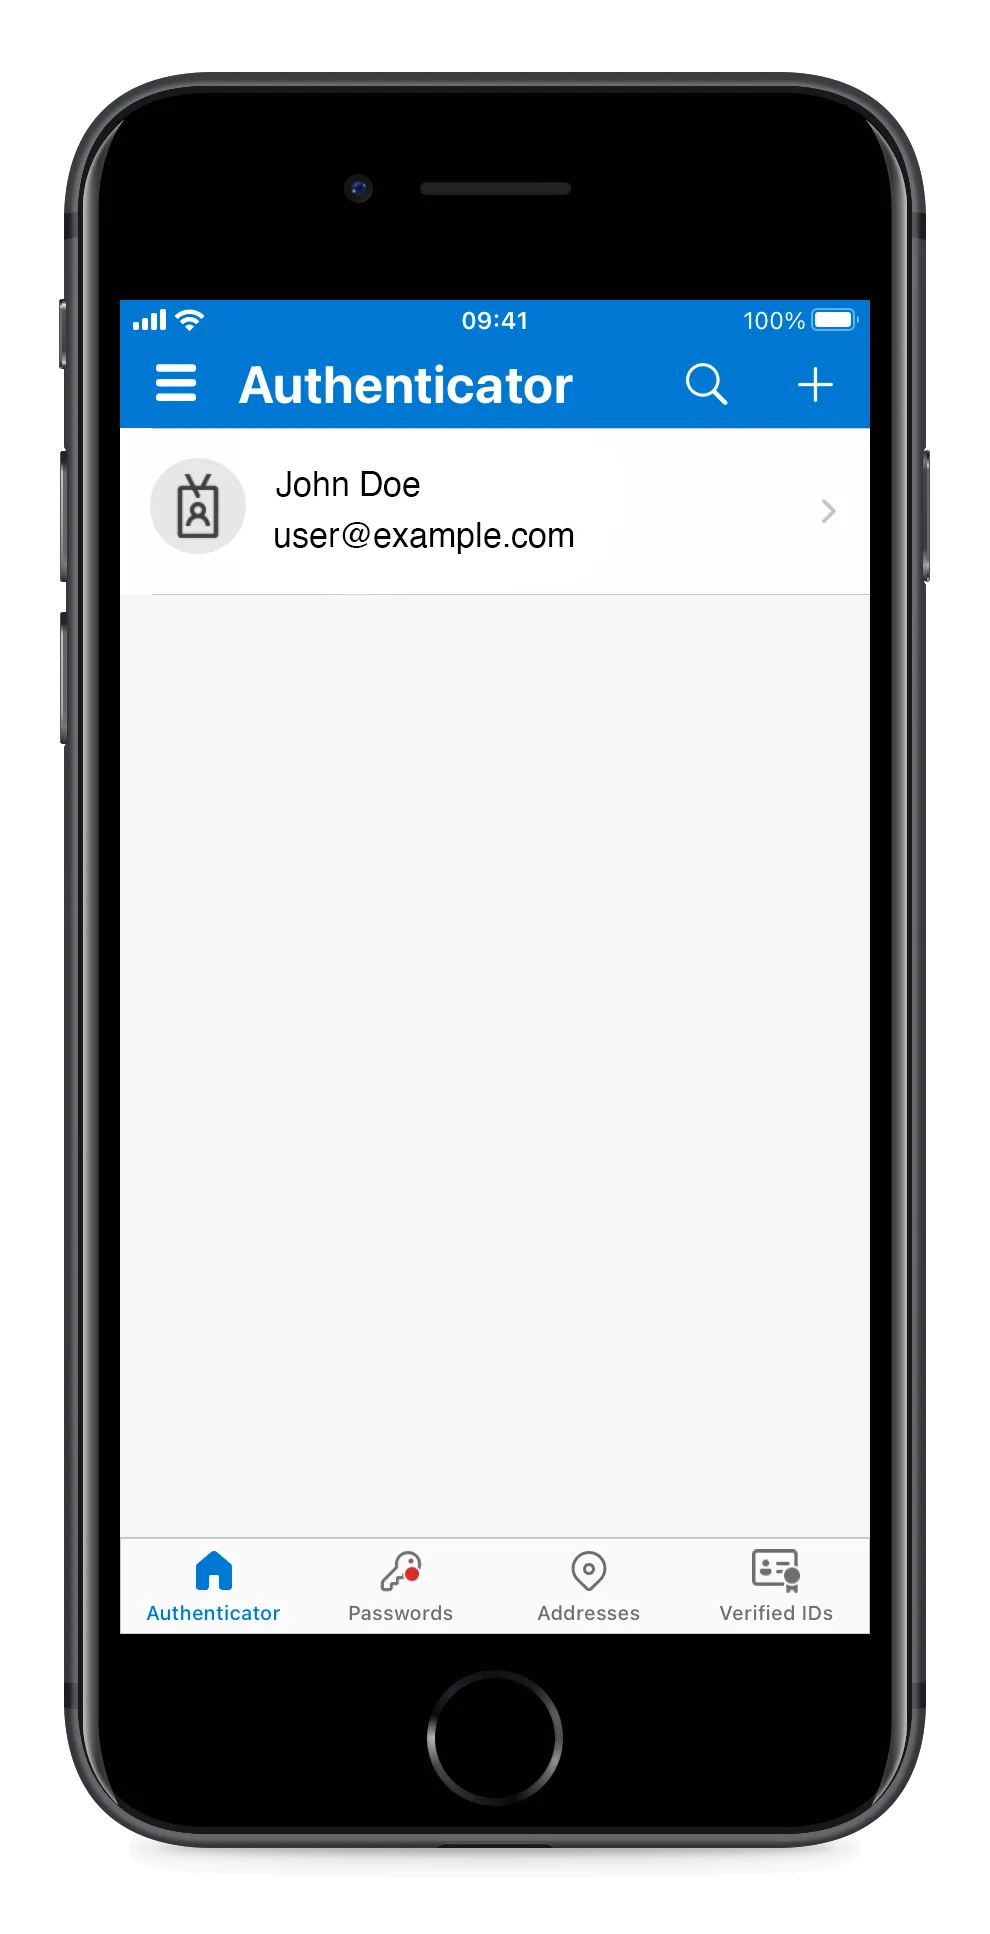
You are returned to the account list, where your new account now appears.
Step 16
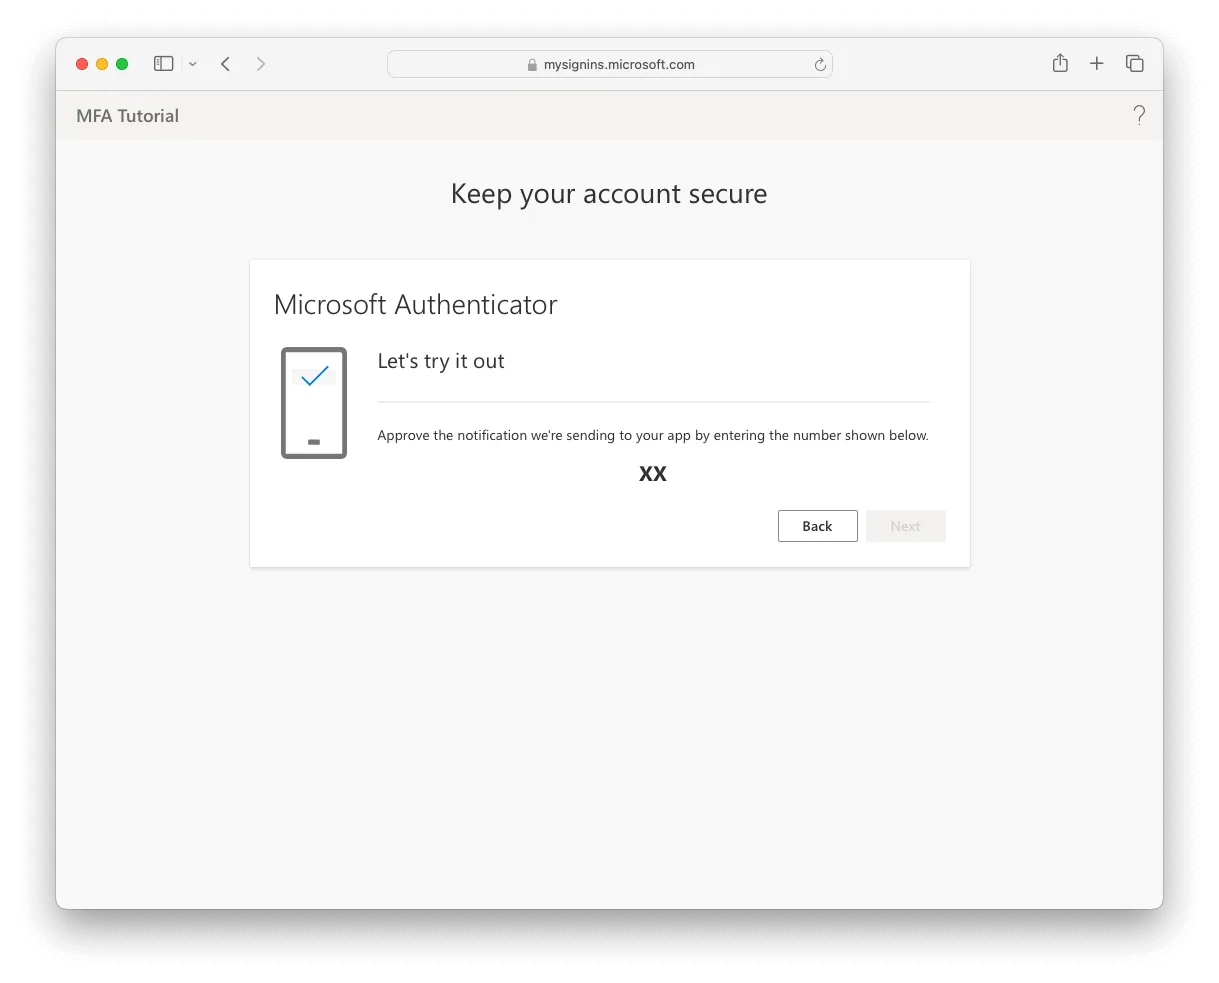
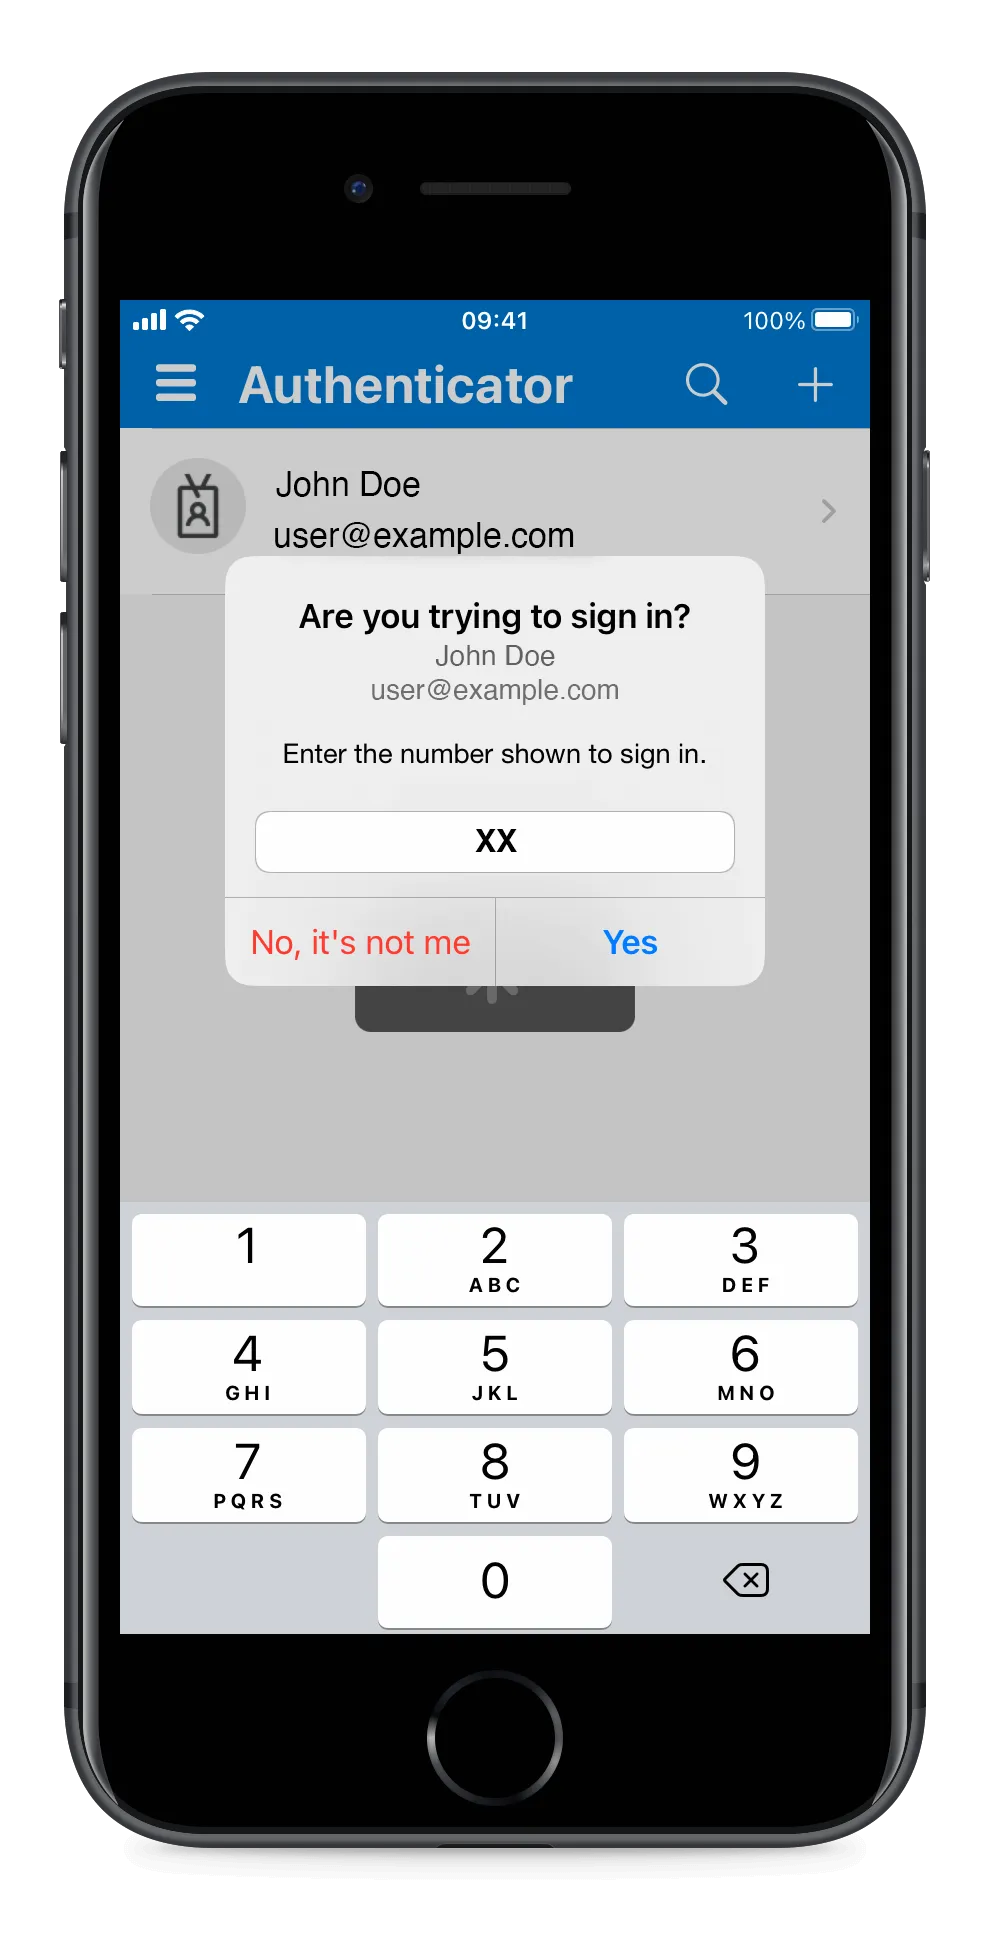
Back on your computer, the browser should still be showing the page from Step 7. Select Next, and Microsoft will check the setup worked. A number appears on the web page which you will need on your phone in a moment.
Step 17
A prompt appears in the app asking for that number. Enter it and tap Yes.
Step 18
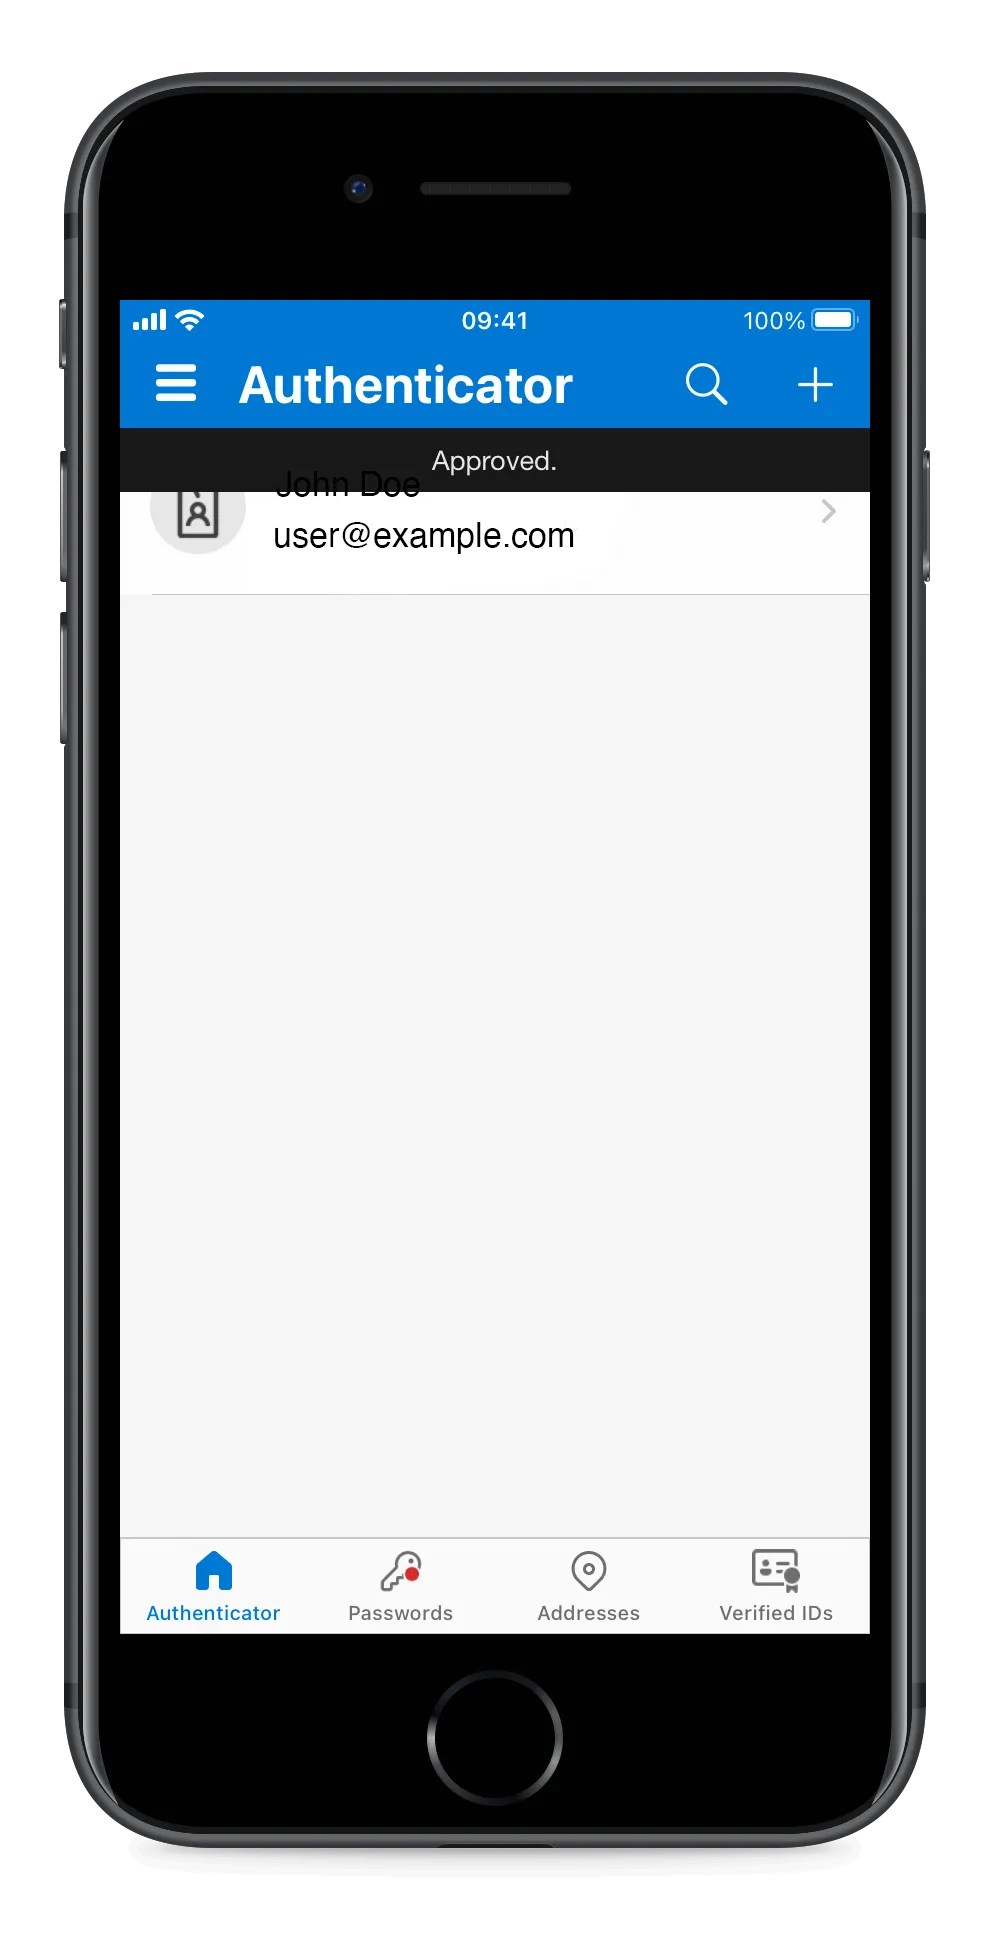
The prompt disappears and a short Approved banner confirms it worked.
Step 19
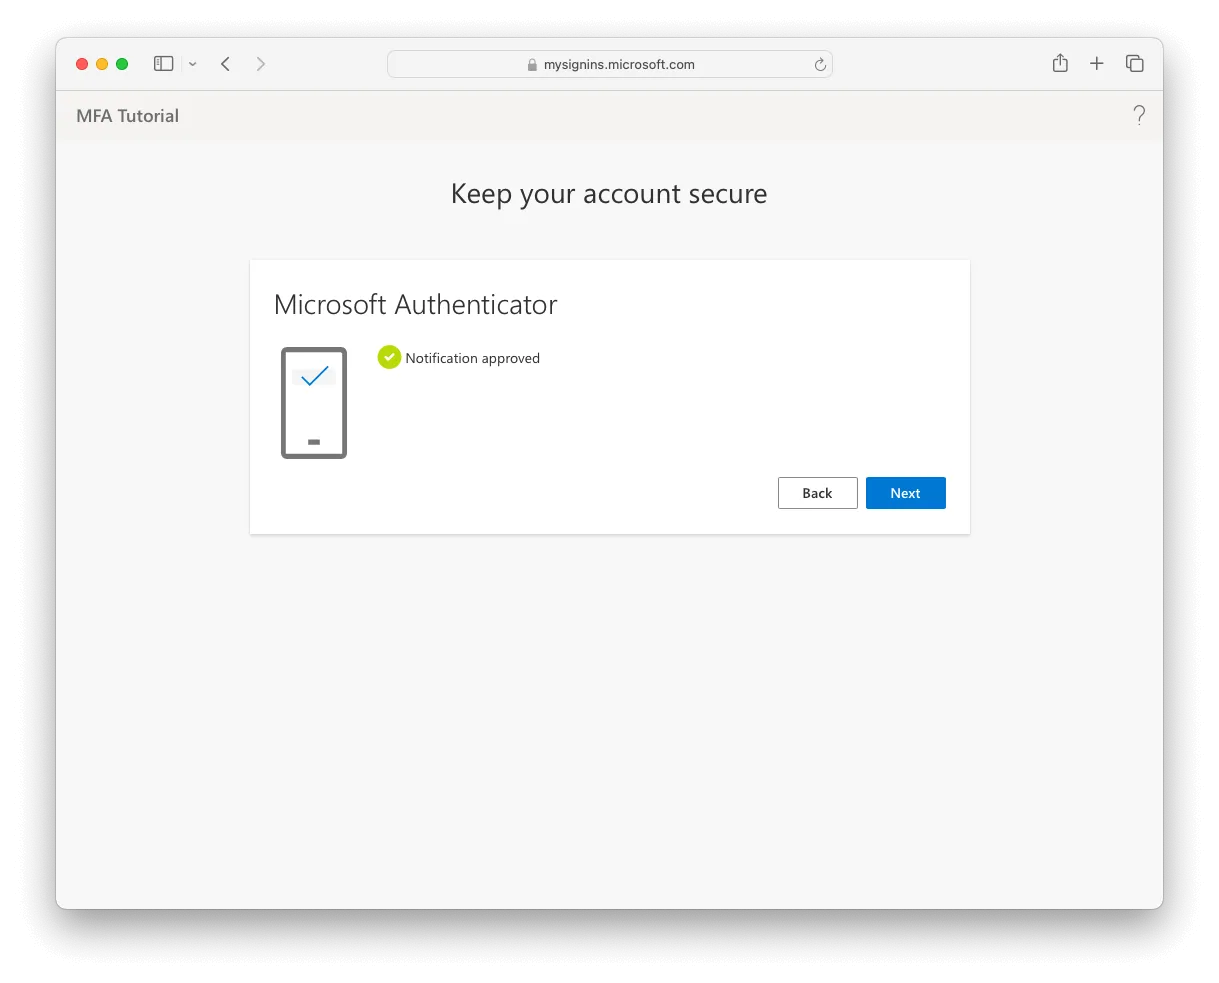
On your computer, the page confirms the notification was approved. Select Next.
Step 20
The page confirms multi-factor authentication is set up, and that future sign-ins will use your app. Select Done.
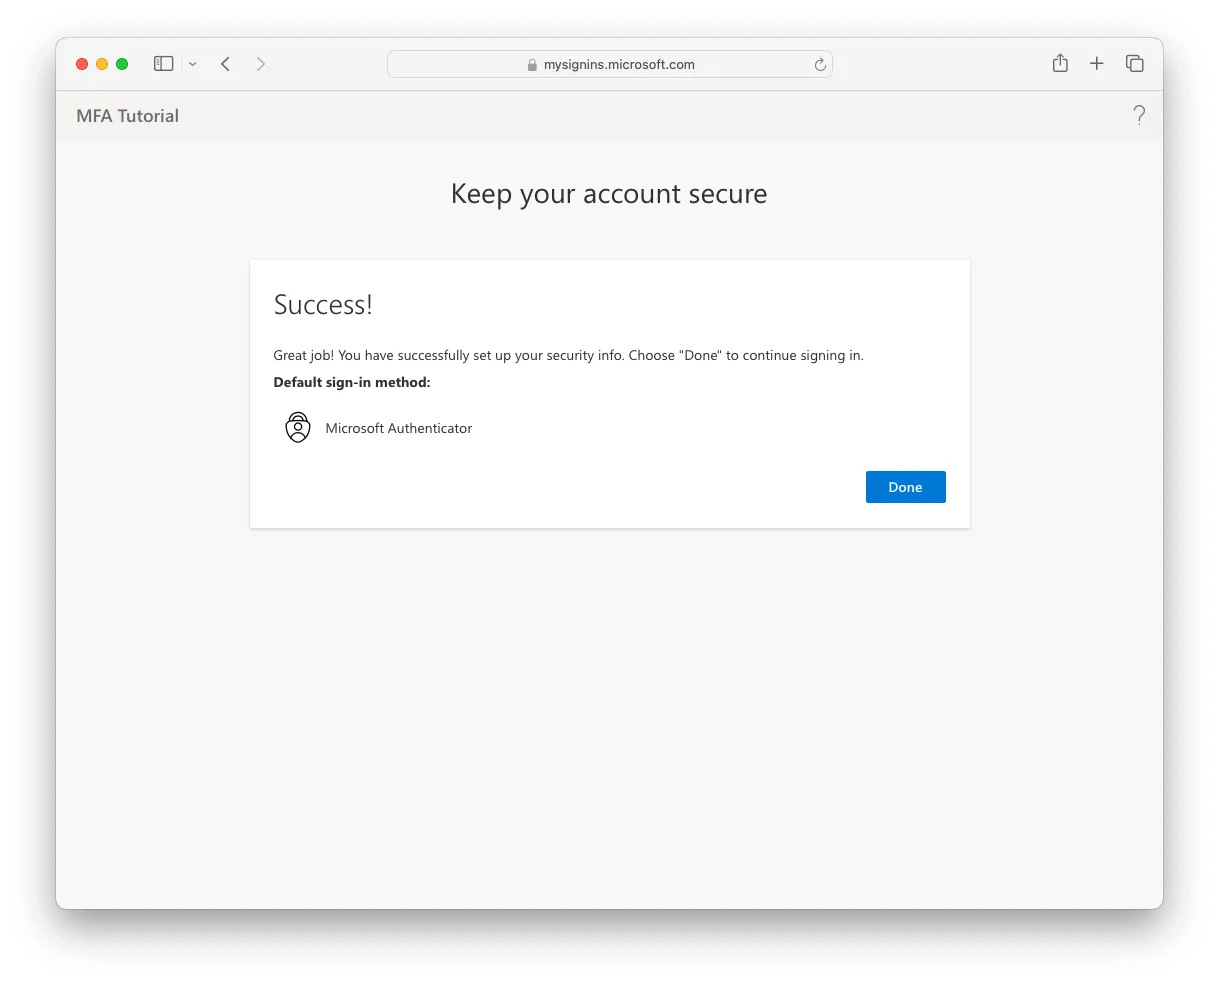
That is the setup finished. You will not be asked to repeat it on that computer.
Adding another device
Once your first device is done, you can add others that are also able to approve sign-ins. It is not mandatory, but it is worth five more minutes.
It matters most in two situations. The first is a shared mailbox such as info@ or accounts@, where several people may need to get in. The second is simply losing your phone: if your only authenticator goes missing or gets replaced, getting back into the account becomes slow and tedious, and a second method avoids that entirely.
Go to aka.ms/mfasetup (opens in a new tab), sign in, choose Add sign-in method, select Microsoft Authenticator, and follow the same steps from Step 5 onwards on the new device.
What changes day to day
Less than people fear. On the devices you already use, carry on as before. When you sign in somewhere new, add your account to a new app, or use an unfamiliar browser, your phone asks you to approve it.
One habit worth keeping: if your phone asks you to approve a sign-in and it was not you, do not approve it. That prompt means somebody has your password and is trying to use it. Decline it, and change your password straight away.
Getting a new phone
Move your authenticator across before you wipe the old handset. Microsoft Authenticator can back up and restore your accounts, and if you registered a second method as suggested above, you have a way back in regardless.
If the old phone has already gone and you are locked out, do not spend an afternoon on it. Whoever administers your Microsoft 365 can reset your authentication methods so you can set it up fresh.
If you get stuck
Every screen above is numbered, so if something does not look right, tell us the step number you are on and we can pick it up from there.
If your email is part of what we look after, or you would like it to be, get in touch and we will get you and your team set up properly. It is also worth reading our guide to Microsoft 365 email on your phone and desktop, since the two go together.